As an Amazon Associate, I earn from qualifying purchases.


Price: $239.99 - $169.99
(as of Jan 03, 2026 02:39:05 UTC – Details)

B0DJNV3GPR,
From the brand

Why is my CT reading showing a negative value?
This issue may arise from incorrect…
, ,
Reviewer: Surajmal Rathee
Rating: 5.0 out of 5 stars
Title: Great Whole-Home Energy Monitor with Home Assistant Support!
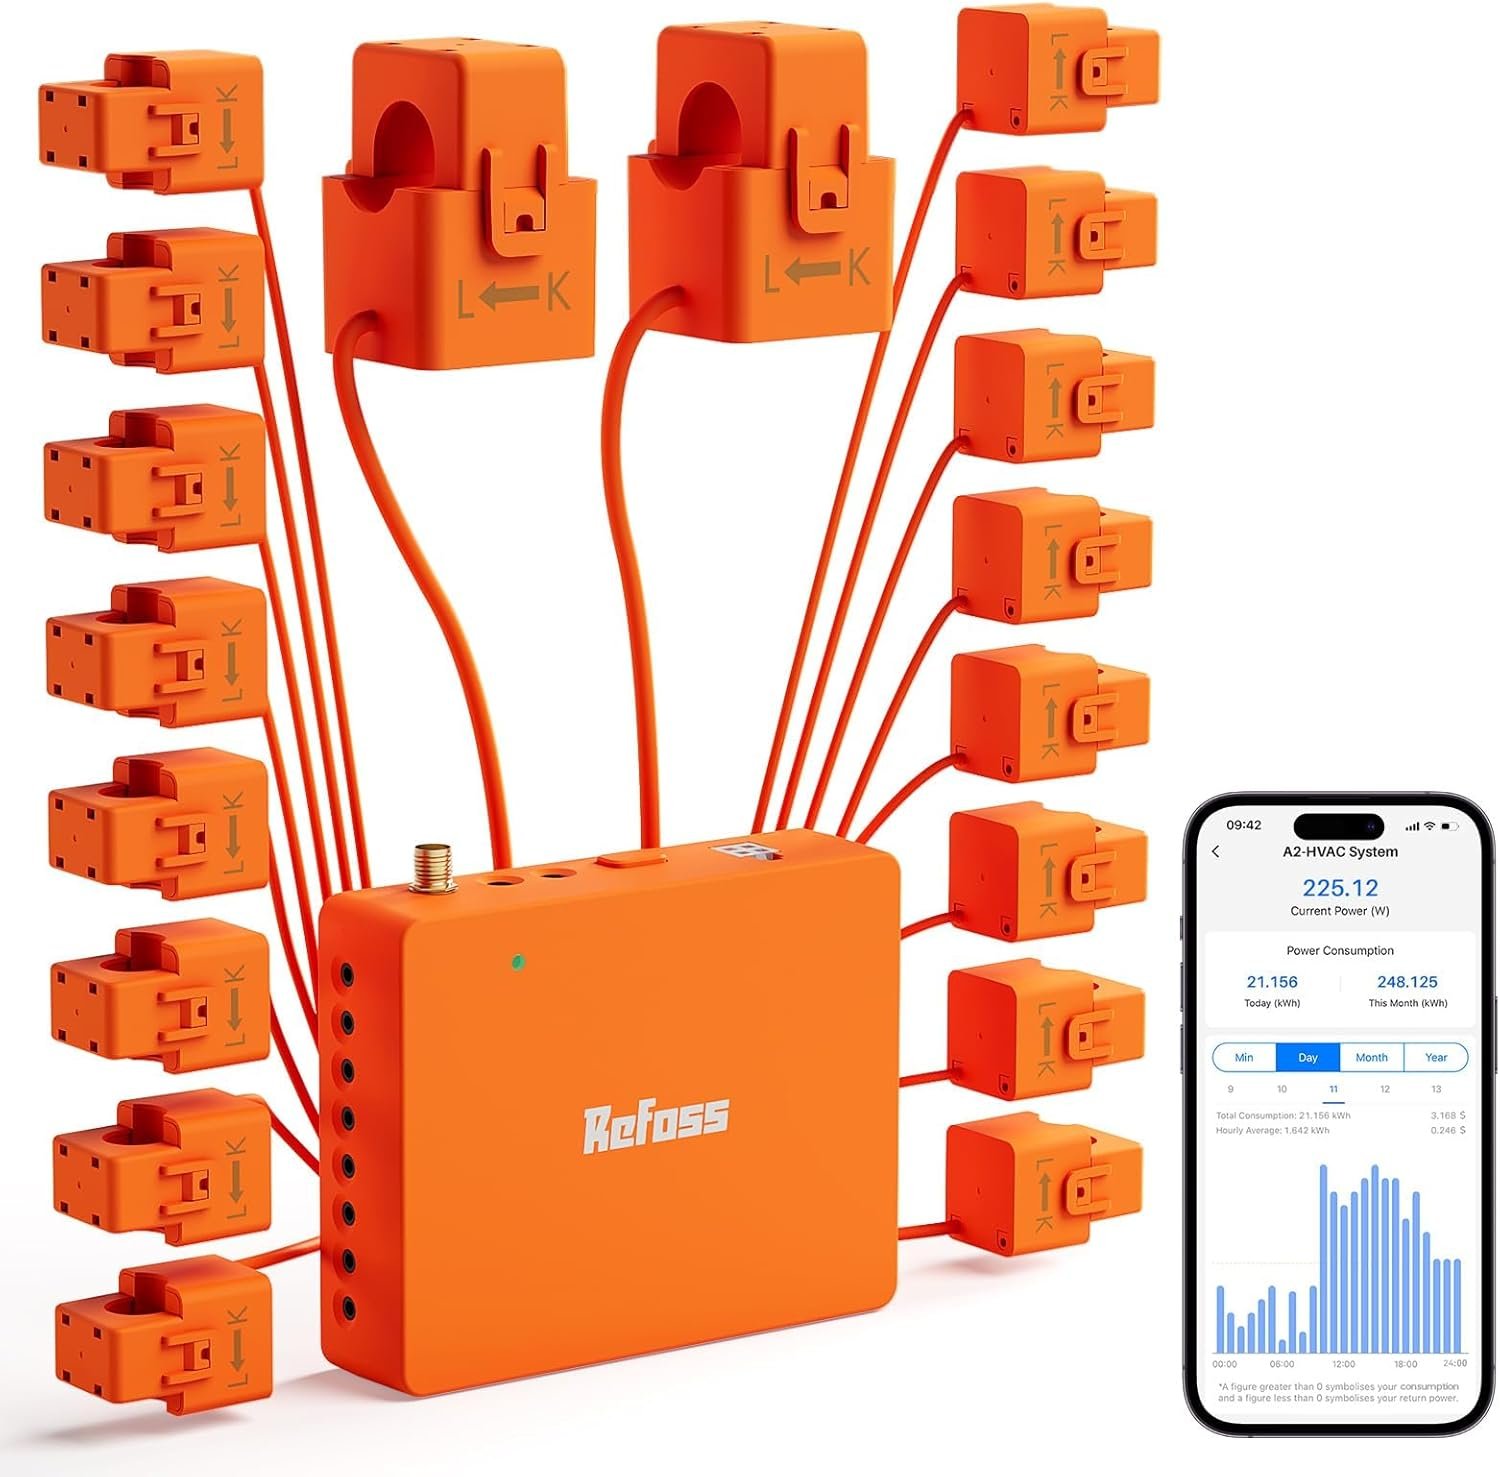
Review: I’ve been using the Refoss Smart Energy Monitor for a week now, and I’m thoroughly impressed. One of the standout features is its local integration with Home Assistant, which is precisely why I chose this energy monitor.The instructions were straightforward, and the video on the Amazon listing was particularly helpful, guiding me through the entire installation process. It should be relatively easy for anyone with basic electrical knowledge and some handy skills. However, I recommend doing some pre-planning before installation to determine which circuits you want to monitor. There are five L1 circuit sensor, five L2 circuits sensor, and six circuits sensor that can be used on either L1 or L2. You’ll need to choose one or the other. Additionally, you can combine some circuits and use one clamp for them, as long as they don’t exceed the current limit of the circuit sensor. For instance, I combined two kitchen outlets into one, saving me a sensor I used for monitoring a different.For balanced 240V loads like an AC unit or an EV charger, you can use one clamp and then change the circuit factor to 2 in the Refoss app or create a helper in Home Assistant that multiplies the energy usage by 2. This is because with balanced loads, the energy drawn on both lines is the same, which is why it’s called a balanced load. This way, you can save a sensor to monitor another circuit. I highly recommend making a note of which sensors are connected to which circuits to avoid wasting time trying to remember where you connected them.Setting up the energy monitor on the app was a breeze. I simply downloaded the Refoss app, followed its instructions to connect it to Wi-Fi, and updated the software of the energy monitoring module. The Refoss app allows you to monitor live energy usage for each connected circuit and view a history of energy usage for each circuit, broken down by day, week, month, and year which is awesome for using the app on its own.Connecting to Home Assistant was equally easy. I searched for the Refoss add-on, and the energy monitor was automatically detected on my network. It brought over all the entities shown in the Refoss app and then I got to setting up everything in home assistant.Overall, I highly recommend this affordable and reliable whole-house energy monitoring system. If you use Home Assistant, this is one of the best options out there that is supported natively through the Refoss addon.
Reviewer: Rishik Keshari
Rating: 5.0 out of 5 stars
Title: Excellent Smart Energy Monitor
Review: The Meross Smart Home Energy Monitor works really well. Setup was simple and the instruction manual is really easy to follow. I like the build quality of the product and it comes with a lot of accessories. It gives accurate real-time readings and connects nicely with wifi. I like it tracks energy use in detail and the data can be downloaded from the app. Overall, it’s a reliable and useful tool for keeping an eye on home/business energy consumption.
Reviewer: Ryan
Rating: 4.0 out of 5 stars
Title: Solid Hardware, Great for Home Assistant, App Just Needs Some Love
Review: So far, the Refoss 16-channel power meter has been pretty solid. Install was straightforward, and the hardware feels high quality — about on par with Sense or other higher-end monitors I’ve used. My only small gripe on the hardware side is that it’d be nice if Refoss offered some CT clamp extension cables to help clean up wiring in a 200-amp panel. I have had no issue with the units integrated wireless receiver and it has been very reliable.The app itself is decent, but if you’re coming from Sense, it’s definitely a step down in polish. There’s no device detection or load learning, which feels like a weird omission these days. I’d love to see options to merge CTs in the app or have a bit of smart recognition when certain appliances (like the fridge or microwave) kick on.That said, this thing absolutely kills it with Home Assistant. That’s really where it shines. Setting up automations and triggers off individual clamp readings has been way more reliable than Sense ever was, and honestly, that alone makes it worth the upgrade.Overall, the Refoss delivers great hardware, accurate readings, and solid integration potential. The app could use some love, but if you’re the kind of person who enjoys tinkering and wants full control over your power data, this is a great pick.
Reviewer: waehrik
Rating: 5.0 out of 5 stars
Title: Easy install with high quality parts and plug and play design
Review: The popularity and availability of energy monitors has exploded in recent years which makes sense as electric rates have increased along with an increasing awareness of the importance of being more energy conscious. I have a solar system with Enphase micro inverters which gives me a whole house overview of consumption at the meter but it’s only a sum of all of the circuits. So far I had been holding off on a more granular solution and waited for the market to mature a little more. Until now.This Refoss system gives that next level of detail and allows viewing of each individual circuit. My house is a little different as everything is electrified including two electric cars so I have a pair of 200A panels instead of a more common single 100 or 200A panel. That means to cover everything I need two of these units as each has a separate 200A feed. I don’t know if there is enough capacity to support a single 400A feed but the main current sensors have some extra space so it may fit. But I can confirm that they work perfectly on the 200A feed.Installation is very easy and is plug and play without needing any contact with the conductive parts of wires with the exception of the power supply to the unit itself. It’s most convenient to install it on a dedicated breaker which is what I did. Other than that, all of the sensors are added to existing wires without having to touch any energized contacts or disconnect anything. It’s extremely easy. On the other end they plug into the main box. The wires are long which means they’ll reach from anywhere and it does mean that there will be a bit extra more than necessary inside the panel but it’s all hidden with it closed. It’s the compromise to having plug and play connections which I prefer over having spring contacts that can work loose and be less reliable and with higher impedance. The sensors themselves are extremely high quality with mirror finished faces that mate up firmly which means they’ll be quite accurate.The app works well and unlike my Enphase app gives per-connection details. As others have noted I wish it could be configured with a custom map and labels based on a photo of the panel even, but it’s perfectly functional as it is.
Reviewer: Amir
Rating: 5.0 out of 5 stars
Title:
Review: I have been trying out the Refoss EM16 Smart Energy Monitor for a while now, and I must say, I’m impressed. It was easy to install—good instructions and helpful online videos meant the whole process was simple and quick. Took about an hour to have everything up and running, and all plugged in to the Refoss app successfully.I like best that this product is so versatile and thoughtful in design. You can just plan and label your circuits ahead of time, and if a clamp is showing up in the negative direction, you can simply reverse it in the app without the need to rewire. If you require additional circuits to be monitored, you can bus their wires together into a CT so long as they’re on the same phase. The application is simple to operate, giving real-time monitoring of all the circuits, and detailed energy history by day, week, month, or year.Home Assistant support is where this product really shines. EM16 auto-commands and provides complete local access to all the data of each circuit, enabling advanced automation without the cloud. Solar system owners will love Zero Feed-In Automation—putting extra solar energy to use powering devices such as EV charging points or water heaters rather than returning it to the grid.The recent firmware releases saw the addition of various useful features, including channel merging, export of CSV data, improved dashboards, and inverting CT readings in software. The releases show that Refoss is refining the product according to feedback from users.Overall, the EM16 is a wonderful, budget-friendly energy monitoring system—easy to install, full of data, and ideal for smart home residents as well as anyone wishing to gain better control of and track their home energy usage. Highly recommended.
Reviewer: Chris.
Rating: 5.0 out of 5 stars
Title:
Review: I was pleasantly surprised by how easy this device was to install. The documentation is clear, well-structured, and provides all the necessary details to get started quickly.If you need extra help, there are also several installation videos available online, which can guide you step by step. Personally, I was able to complete the installation in about one hour without any major issues. It really is just a matter of following the instructions.Once the hardware is in place, all you need to do is download the Refoss app on your phone, and the setup takes just a few minutes.What I really appreciate is that it’s also compatible with HomeAssistant for those into home automation. It integrates smoothly and is very easy to configure.Overall, this product is extremely simple to install compared to other, much more complex solutions I’ve used in the past. Highly recommended for anyone looking for an easy-to-use smart energy monitor.
Reviewer: jimbo
Rating: 4.0 out of 5 stars
Title:
Review: This device is easy to install , but as others have said you have to do some preplanning as to which ckts you are going to monitor as you are limited to which ct clamp can go onto which phase. There have been a number of users that complain that certain channels report negative values even though the ct’s were installed properly. I have the same issue – 4 out of 16 were backwards. Not a big deal as it can be easily changed in the settings by changing the circuit factor to -1 , but this indicates very poor quality control by the manufacturer. WTF they had one job – 2 wires – its not rocket science.Another poor design feature is the size of strain relief connector for the wifi antenna – it is too small for a standard 1/2″ knock out in the breaker box. You need to improvise with some sort of rubber gromet.I wish there was the ability to trend amps on each channel on a per minute basis so that I can monitor devices that cycle on and off. The only available graph trend is the total kwh value over an entire day – not much use for a motor that is only on for a few minutes. There is the possibility that when paired with Home Assistant you would be able to build your own trending graph, but I am not sure.Overall, I would recommend this monitor for basic power consumption trending and to see if some devices are using more power than you expected (ie older freezers and such). Only 4 stars because of the limited control you have over the graph/reports.
Reviewer: Shawn OReilly
Rating: 5.0 out of 5 stars
Title:
Review: I self installed this on my 200amp panel and it works very well. Installation was straightforward as long as you’re comfortable doing work inside the panel (make sure the power is off!). It’s been really useful to see where unexpected power draws are coming from, such as a heater in one of my adult children’s rooms that I did not know about! Recommended for all who enjoy having details of what’s happening in their house.
Reviewer: Tom
Rating: 5.0 out of 5 stars
Title:
Review: I’m very happy with the EM 16. It does everything I was hoping it would. Install was easy. It took max 30 minutes once I got started. The app connected without issue.I installed all circuits as called out in the instructions but some circuits were showing negative power (as in energy flowing back to the grid) which was definitely not correct. I think that has more to do with my house but either way there are 2 ways to fix that. Either flip the clamp or set the power factor to -1 in the app which is essentially the same as physically flipping the clamp.The Home Assistant integration is great. There’s almost no setup to connect it. The integration is native so when I added it to Home Assistant it connected itself to the EM16 without any additional inputs.Tips:- Install is really simple, power off to the whole house, connect the WiFi antenna, connect the power lead directly to a circuit, attached the clamps.- Do some planning before install. Consider which circuits should be monitored if you have more than 16. I wrote it out on excel first which made revisions before I started the install easy. It also made it easy to rename the circuits in the app after setup was complete- Mark the circuits you’ve planned on the breakers since the circuit numbers won’t be visible when the panel cover is taken off.- There are 3 types of clamps, A, B, and C. A and B clamps need to be on different phases. C clamps need to adopt either the A phase or the B phase but they can’t be on both. On North American panels, generally, each row of circuits (assuming the panel is oriented with the long edge vertically) is on a single phase. That means starting at the top of the panel and working down each row alternates phases.The photo with the panel cover is after the install. Apart from an antenna there’s no sign of the EM16.
, Tools & Home Improvement > Electrical > Home Automation Devices > Modules, #Smart #Home #Energy #Monitor #Supports #Home #Assistant #RealTime #Accurate #Energy #Con..,
Instantly Access Your FREE Children’s Books Here!
As an Amazon Associate, I earn from qualifying purchases; I may earn a commission from qualifying purchases as an affiliate.